AIR FRYER CHEESE BREAD ROLLS
A complete, deeply detailed, chef-level guide
Introduction
Cheese Bread Rolls are one of those comfort foods that hit perfectly every time. Crispy on the outside, soft and fluffy on the inside, with melted, stretchy cheese in every bite — it’s the kind of snack that feels indulgent but can actually be made quite easily at home.
Traditionally, bread rolls are either deep-fried or baked, but using an air fryer transforms the experience. You get the same golden crisp texture with far less oil, making it lighter while still incredibly satisfying.
These rolls are perfect for:
- Evening snacks
- Party appetizers
- Lunchbox additions
- Quick comfort food cravings
What makes this version special is that we’re not just throwing cheese into bread — we’re building layers of flavor, texture, and technique so that every bite feels professionally made.
Chef’s Philosophy Behind This Recipe
A great cheese bread roll is about balance:
- The bread must be soft but strong enough to hold filling
- The filling must be creamy but not soggy
- The outside must be crispy without being greasy
Most people mess this up by:
- Overfilling (causes bursting)
- Not sealing properly (cheese leaks out)
- Using too much moisture (results in soggy rolls)
In this recipe, we control all those factors carefully.
Difficulty Level
Beginner to Intermediate
If you can handle basic kitchen prep, you can absolutely master this.
Timing
- Preparation Time: 25–30 minutes
- Resting Time: 10 minutes
- Air Frying Time: 10–15 minutes
- Total Time: Around 45–55 minutes
Yield
Makes about 8–10 medium-sized rolls
Ingredients
For the Bread Base
- 8–10 slices of white or brown bread
- Fresh bread works best, but slightly stale bread is easier to shape
For the Cheese Filling
- 1 cup grated mozzarella cheese
- 1/2 cup processed cheese (optional for extra creaminess)
- 2 tablespoons finely chopped onions
- 2 tablespoons finely chopped capsicum (bell pepper)
- 1–2 green chilies (finely chopped, optional)
- 1/2 teaspoon black pepper
- 1/2 teaspoon red chili flakes
- 1/2 teaspoon dried oregano or mixed herbs
- Salt to taste
Binding & Coating
- 2 tablespoons all-purpose flour
- 3–4 tablespoons water (to make a paste)
- 2–3 tablespoons milk (optional for brushing)
- 1–2 tablespoons oil (for brushing or spraying)
Equipment Needed
- Air fryer
- Rolling pin (optional)
- Knife
- Mixing bowl
- Brush or spray bottle
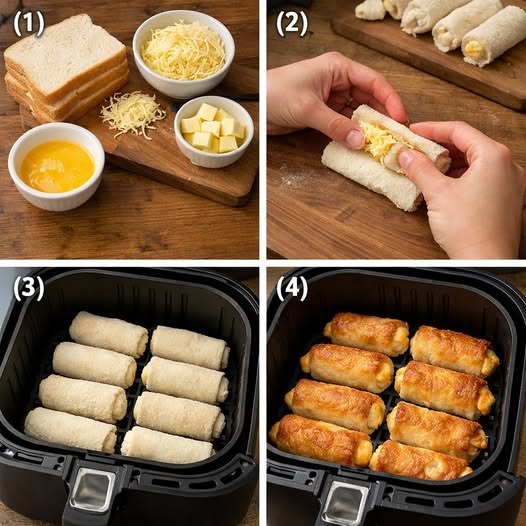
Step 1: Preparing the Filling
Start by creating a flavorful, balanced filling.
In a mixing bowl:
- Add grated mozzarella and processed cheese
- Add chopped onions, capsicum, and green chilies
- Sprinkle black pepper, chili flakes, oregano, and salt
Mix everything thoroughly until evenly combined.
Important tip:
Do not add watery vegetables or sauces. Moisture is the enemy here — it will make your rolls soggy and cause them to break.
Set the filling aside.
Step 2: Preparing the Bread
Take each bread slice and cut off the edges. This helps in shaping and sealing.
Now lightly flatten each slice using:
- A rolling pin, OR
- Your hands
You don’t want to crush it completely — just enough to make it flexible.
If the bread feels dry:
Lightly sprinkle a few drops of water or milk on it. Do not soak it.
Step 3: Making the Sealing Paste
In a small bowl:
- Mix 2 tablespoons flour with water
- Make a thick, smooth paste
This will act as glue to seal the rolls.
Step 4: Shaping the Rolls
Now comes the most important part.
- Place a flattened bread slice on a clean surface
- Add 1–2 tablespoons of filling in the center
- Fold the sides inward
- Roll it tightly into a cylindrical shape
Seal the edges using the flour paste.
Make sure:
- No cracks
- No open edges
- Filling is fully enclosed
If not sealed properly, cheese will leak during air frying.
Repeat for all slices.
Step 5: Prepping for Air Frying
Preheat your air fryer at 180°C for 3–5 minutes.
Meanwhile:
- Lightly brush or spray oil on the rolls
- You can also brush a little milk for better color
Do not skip oil completely — a light layer helps achieve crispiness.
Step 6: Air Frying
Place the rolls in the air fryer basket.
Important:
- Do not overcrowd
- Leave space between rolls
Air fry at:
- 180°C for 10–15 minutes
Halfway through (around 6–7 minutes):
- Flip the rolls
- Brush a little oil if needed
Cook until:
- Golden brown
- Crispy on the outside
Step 7: Resting
Once done, remove the rolls and let them rest for 2–3 minutes.
This allows the cheese inside to settle slightly and prevents burning your mouth.
Texture Check
A perfect roll should have:
- Crisp outer layer
- Soft inner bread
- Melted, stretchy cheese filling
If your rolls are too soft:
You didn’t air fry long enough.
If too hard:
Temperature may have been too high.
Serving Suggestions
Serve hot with:
- Ketchup
- Garlic mayo
- Chili sauce
You can also cut them into halves for a better presentation.
Variations
1. Spicy Version
Add:
- Extra green chilies
- Hot sauce
- Crushed red pepper
2. Chicken Cheese Rolls
Add cooked shredded chicken to the filling.
3. Veggie Loaded Rolls
Add:
- Corn
- Carrots
- Mushrooms (very finely chopped and dry)
4. Garlic Butter Rolls
Brush with garlic butter after air frying.
Storage Tips
If you want to store:
Refrigerator:
- Store in airtight container for up to 2 days
Freezer:
- Freeze uncooked rolls
- Air fry directly when needed (add 2–3 extra minutes)
Common Mistakes to Avoid
- Overfilling
Leads to bursting and mess - Too much moisture
Makes rolls soggy - Not sealing properly
Cheese leaks out - Skipping oil
Results in dry texture - Overcrowding air fryer
Leads to uneven cooking
Pro Tips for Perfect Results
- Use mozzarella for stretch and processed cheese for creaminess
- Always preheat air fryer
- Flip halfway for even browning
- Keep filling dry and balanced
- Seal tightly like you mean it
Final Thoughts
These Air Fryer Cheese Bread Rolls are simple in concept but incredibly satisfying when done right. The magic lies in technique — once you master shaping and sealing, you can experiment endlessly with fillings and flavors.
This is the kind of recipe you can turn into:
- A snack business idea
- A viral food content video
- A go-to comfort dish
Leave a Reply