Air Fryer Potato Slices – The Ultimate Crispy Golden Masterclass Guide
Introduction & Background
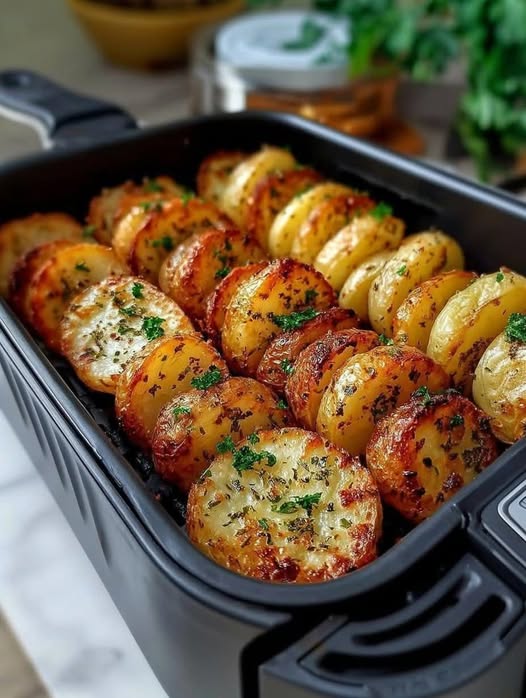
Air Fryer Potato Slices may look like one of the simplest recipes in modern cooking, but beneath that simplicity lies a deep culinary transformation that has existed for centuries. Potatoes, one of the world’s most consumed staple foods, have always been associated with comfort, versatility, and satisfaction. From rustic countryside meals in Europe to street food stalls in Asia, potatoes have found their way into nearly every cuisine on earth.
The origin of the potato itself traces back to the Andean region of South America, where ancient civilizations cultivated it thousands of years ago. When Spanish explorers brought potatoes to Europe in the 16th century, they quickly became a revolutionary crop due to their ability to grow in harsh conditions and provide high energy output. Over time, potatoes evolved into countless dishes: fries, chips, gratins, baked potatoes, mashed potatoes, and roasted variations.
Among all these forms, sliced potatoes hold a special place because they offer a perfect balance of texture and surface area. When sliced thin or medium and exposed to high heat, the potato transforms dramatically—its outer starch layer crisps into a golden crust while the inside softens into a fluffy, almost creamy texture.
Now enter the air fryer: a modern kitchen innovation that has changed how people cook fried-style foods. Instead of deep oil immersion, the air fryer uses rapid hot air circulation to achieve similar crisping effects with minimal oil. This technology has made it possible to enjoy crispy potato slices that are lighter, healthier, and faster to prepare than traditional frying or oven roasting.
Air Fryer Potato Slices represent the meeting point between tradition and modern cooking science. They take a centuries-old ingredient and elevate it with precision heat control, producing a snack or side dish that feels both nostalgic and modern at the same time.
What makes them especially powerful in everyday cooking is their versatility. They can be eaten plain, seasoned heavily, used as a base for loaded toppings, or paired with proteins like chicken, steak, or eggs. Despite their simplicity, they can be transformed into gourmet-style food with just a few adjustments in technique.
Chef’s Philosophy & What Makes This Version Exceptional
To truly master Air Fryer Potato Slices, you need to think beyond just “cooking potatoes.” You are actually controlling three key scientific elements: moisture, starch behavior, and heat interaction.
This recipe is built on a deeper culinary philosophy: great texture is not created by ingredients alone, but by controlling how those ingredients behave under heat.
1. Moisture Control as the Foundation
Potatoes naturally contain a significant amount of water. When exposed to heat, this water turns into steam. If not managed properly, this steam prevents crisping and results in soggy or uneven texture.
That is why preparation steps like soaking and drying are not optional—they are essential structural steps. Soaking removes excess surface starch, which otherwise causes sticking and uneven browning. Drying removes surface water so that the air fryer can directly crisp the potato surface instead of steaming it.
2. Starch Transformation and Crisp Formation
The surface of a potato is rich in starch. When heated, starch undergoes gelatinization and then dehydration, forming a crisp outer layer. This is what creates that satisfying crunch.
In air frying, this process happens rapidly due to intense circulating heat. However, if slices are uneven or moisture is inconsistent, starch will not react uniformly, leading to patchy crispness.
3. Heat Distribution and Air Flow Dynamics
Unlike traditional ovens, air fryers rely on high-speed hot air circulation. This means every surface of the potato slice is constantly exposed to heat.
Because of this, spacing becomes critical. Overlapping slices disrupt airflow, causing uneven cooking. Proper arrangement ensures each slice receives consistent exposure, resulting in even golden browning.
4. Oil as a Heat Conductor, Not a Frying Medium
In this recipe, oil is not used for frying but as a heat-transfer enhancer. A thin layer of oil helps carry heat evenly across the potato surface and promotes browning through the Maillard reaction.
5. Flavor Absorption and Surface Coating
Seasonings in this recipe are not just toppings—they are part of the crust formation. When combined with oil, spices adhere to the potato surface and bake into the outer layer, creating deeper flavor instead of just surface dusting.
This philosophy transforms a simple potato dish into a controlled cooking process where every step influences the final texture and flavor outcome.
Difficulty, Timing & Yield
- Difficulty Level: Easy
- Preparation Time: 15–20 minutes
- Soaking Time: 30 minutes (recommended for best crispiness)
- Cooking Time: 18–28 minutes
- Total Time: 1 hour approximately
- Servings: 2–4 portions
Ingredients
For the Potato Base
- 3–5 medium potatoes (Russet, Yukon Gold, or similar starchy variety)
- 1.5 to 2 tablespoons oil (olive oil or neutral oil)
- 1 teaspoon salt (adjust to taste)
Core Seasoning Blend
- 1 teaspoon paprika (for color and smoky depth)
- 1/2 teaspoon black pepper
- 1 teaspoon garlic powder
- 1/2 teaspoon onion powder
- Optional: pinch of chili flakes for heat
Optional Gourmet Additions
- Parmesan cheese (for finishing)
- Fresh parsley or coriander
- Italian herb mix
- Chaat masala for tangy street-style flavor
Step-by-Step Instructions
Step 1: Selecting the Right Potatoes
The foundation of this dish starts with potato selection. Starchy potatoes like Russet or Maris Piper are ideal because they contain less moisture and more starch, which leads to a fluffier interior and crispier exterior.
Waxy potatoes can be used, but they tend to hold shape more and produce less crispiness.
Step 2: Washing and Cutting
Wash potatoes thoroughly to remove dirt and impurities.
Slice them evenly into rounds, approximately 0.4 to 0.6 cm thick.
Uniform slicing is extremely important. If slices vary in thickness, thinner ones will burn while thicker ones remain undercooked.
Step 3: Soaking Process (Critical Step)
Place the sliced potatoes in a bowl of cold water.
Let them soak for 25–30 minutes.
This step removes excess starch from the surface, which:
- Prevents sticking
- Improves crisping
- Enhances browning consistency
After soaking, drain completely.
Step 4: Drying Thoroughly
Spread slices on a clean cloth or paper towels.
Pat dry thoroughly.
Any remaining moisture will turn into steam in the air fryer, preventing crisp formation.
This is one of the most important steps in the entire recipe.
Step 5: Seasoning and Coating
Place dried potato slices in a large bowl.
Add oil, salt, paprika, garlic powder, onion powder, and black pepper.
Mix thoroughly until every slice is evenly coated.
The oil should lightly glaze the surface, not soak it.
This coating helps spices bind to the potato and ensures even browning.
Step 6: Preheating the Air Fryer
Preheat the air fryer to 180°C (350°F) for 3–5 minutes.
Preheating ensures immediate surface searing when potatoes enter the basket, locking in structure early.
Step 7: Arranging for Cooking
Place potato slices in a single layer inside the air fryer basket.
Avoid stacking or overlapping.
Airflow is essential—each slice must be exposed to circulating heat.
If needed, cook in multiple batches.
Step 8: Air Frying Process
Cook for 18–28 minutes depending on thickness.
Shake or flip halfway through to ensure even cooking.
As cooking progresses:
- Edges begin to crisp
- Surface turns golden
- Interior becomes soft and tender
Step 9: Final Crisp Enhancement
In the last 2–3 minutes, slightly increase temperature if needed.
This step intensifies browning and enhances crunch without drying the inside.
Step 10: Resting and Serving
Remove from air fryer and let rest for 2–3 minutes.
This allows the crust to settle and become crispier.
Serve immediately for best texture.
Serving Suggestions
Air Fryer Potato Slices pair with:
- Burgers and sandwiches
- Fried or grilled chicken
- Steak or kebabs
- Breakfast eggs
- Dips like garlic mayo, ketchup, or cheese sauce
They can also be turned into loaded potato slices with cheese, sauces, and herbs.
Pro Tips for Perfect Results
- Always soak potatoes for maximum crispiness
- Dry thoroughly before seasoning
- Maintain consistent slice thickness
- Never overcrowd the basket
- Shake halfway for even browning
Common Mistakes to Avoid
- Skipping soaking step
- Leaving moisture on potatoes
- Overcrowding basket
- Cutting uneven slices
- Overcooking thin slices
Creative Variations
- Cheese-loaded potato slices
- Spicy chili garlic version
- Herb butter style
- Street-style chaat masala slices
- Parmesan crispy version
Scientific Breakdown of Crispiness
The crisp texture comes from the Maillard reaction, where amino acids and sugars react under heat to create browning and flavor.
Starch gelatinization inside the potato creates softness, while dehydration of the outer layer creates crunch.
Air frying accelerates this process by circulating dry heat rapidly across the surface.
Storage & Reheating
Store in an airtight container for up to 48 hours.
Reheat in air fryer at 180°C for 3–5 minutes to restore crispness.
Avoid microwaving.
Final Thoughts
Air Fryer Potato Slices are a perfect example of how simple ingredients can become extraordinary through technique and control.
They are crispy, golden, flavorful, and versatile enough to fit into almost any meal.
When done correctly, they deliver the perfect contrast of crunch and softness in every bite
Leave a Reply