Creamy Chocolate Custard Layer Dessert – Ultra Deep Masterclass
Introduction & Background
The Creamy Chocolate Custard Layer Dessert is not simply a homemade sweet—it is a refined dessert architecture built on centuries of custard evolution, modern chocolate science, and layered texture engineering.
At its core, this dessert belongs to the same family as French custards, Italian chocolate creams, and British layered puddings, yet it pushes far beyond traditional definitions. Where classic custards focused mainly on smoothness and sweetness, this modern version introduces intentional layering, controlled richness, and structural contrast.
Historically, custards were born from simplicity—egg yolks, milk, and sugar gently heated until thickened. They were used in pies, trifles, and baked desserts across Europe. Over time, chocolate was introduced, transforming these simple creams into luxurious desserts served in fine dining kitchens.
This recipe represents the next stage of that evolution.
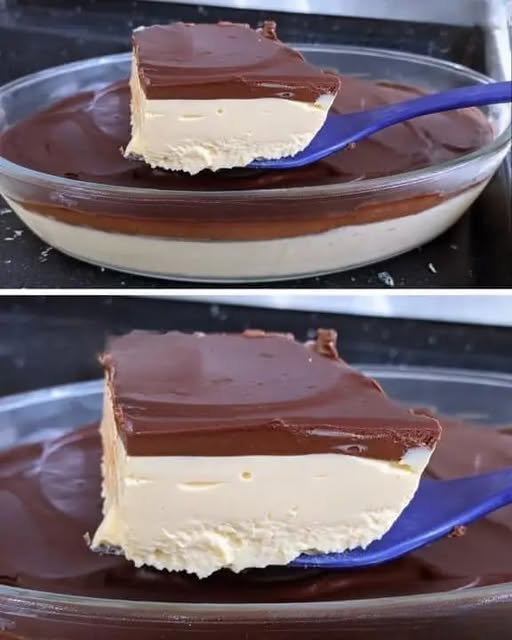
It is designed as a multi-layer chocolate experience, where every spoonful delivers a progression of textures: soft cream, dense custard, deep chocolate intensity, and airy whipped topping.
Unlike single-layer puddings, this dessert is engineered to feel dynamic—almost like eating multiple desserts in one dish.
Chef’s Philosophy & Dessert Architecture Thinking
This dessert is not built like a recipe—it is built like a system.
Every component exists for a structural reason:
- One layer provides stability
- One layer delivers richness
- One layer enhances chocolate intensity
- One layer creates contrast and lightness
If any layer is removed, the dessert loses identity.
1. Custard Engineering Principle (Texture Science Core)
Custard is extremely sensitive because it relies on delicate egg protein coagulation.
The goal is NOT just thickening—it is silky structural suspension.
To achieve this:
- Egg yolks are treated as emulsifiers, not just thickeners
- Heat is controlled to avoid protein tightening
- Cornstarch is added as a stabilizing buffer
This prevents the two biggest failures:
- Scrambled egg texture
- Grainy or split custard
Instead, the result is a velvety chocolate cream base that holds shape but melts instantly in the mouth.
2. Chocolate Depth Layering System
Chocolate is not added as a single flavor element—it is built in stages:
- Cocoa powder → foundational bitterness and depth
- Melted dark chocolate → richness and body
- Optional shavings → textural contrast and finish notes
This creates a flavor curve instead of a flat taste profile.
As you eat, chocolate intensity gradually increases, peaks, then softens again through cream balance.
3. Fat–Protein Balance Engineering
Creaminess is not accidental—it is calculated.
- Milk provides hydration and light structure
- Cream adds fat richness and smooth mouthfeel
- Egg yolks provide emulsification stability
If fat is too high → greasy texture
If protein is too high → rubbery custard
If balanced → luxury spoon texture
This recipe is designed specifically for that balance point.
4. Layer Psychology & Sensorial Experience Design
This dessert is built around how the human palate experiences layers.
Each spoon should travel through:
- Light whipped cream top
- Soft airy transition layer
- Dense chocolate custard core
- Optional biscuit or base support layer
This creates a progressive eating experience, not a static one.
Difficulty, Timing & Serving Yield (Extended Breakdown)
Difficulty Level: Medium–Advanced (temperature precision required)
Preparation Time: 30–35 minutes
Cooking Time: 20–25 minutes
Chilling Time: 4–6 hours minimum
Total Time: 6–7 hours
Servings: 6–8 rich dessert portions
Ingredients (Full Structural Breakdown)
Chocolate Custard Base Foundation
- 2 cups whole milk → hydration + light structure
- 1 cup heavy cream → richness + silky texture formation
- 4 large egg yolks → emulsification + custard thickening system
- 1/2 cup sugar → sweetness + structural stabilization
- 1/3 cup cocoa powder → deep chocolate backbone
- 2 tablespoons cornstarch → stability control + thickening insurance
- 1 teaspoon vanilla extract → aromatic balance layer
- Pinch of salt → enhances chocolate depth and removes flatness
Chocolate Intensity Boost Layer
- 150g dark chocolate (melted) → primary richness layer
- 2 tablespoons butter → gloss, smoothness, and melt quality enhancement
Top Cream Layer System
- 1 cup heavy whipping cream (whipped) → lightness and contrast
- 1–2 tablespoons powdered sugar → stabilized sweetness
- Optional vanilla drop → aroma refinement
Optional Structural Enhancers
- Chocolate shavings → texture contrast
- Crushed biscuits → base crunch layer
- Espresso shot → mocha depth enhancement
- Sea salt flakes → gourmet contrast finish
Step-by-Step Method (Advanced Custard Control Technique)
Step 1: Dry Chocolate Base Preparation
In a bowl, combine:
- Cocoa powder
- Sugar
- Cornstarch
- Salt
Mix thoroughly until completely uniform.
This ensures:
- No cocoa clumping
- Even starch distribution
- Stable thickening later
At this stage, you are building the flavor and structure base powder system.
Step 2: Egg Yolk Pre-Emulsion
Whisk egg yolks separately with a small portion of milk.
This step:
- Prevents curdling under heat
- Starts emulsification chain
- Prepares yolks for thermal adaptation
Think of this as temperature conditioning for proteins.
Step 3: Controlled Dairy Heating Phase
Heat milk and cream gently in a saucepan.
Important rule:
DO NOT BOIL.
Ideal state is:
- Hot steam rising
- No rolling bubbles
This preserves:
- Fat structure
- Protein integrity
- Smooth texture potential
Step 4: Custard Building Phase (Critical Step)
Slowly whisk dry mixture into warm milk.
Then temper egg mixture gradually into the saucepan.
This phase determines final quality.
Correct execution results in:
- Glossy custard base
- Smooth viscosity
- No grain formation
Incorrect execution results in separation or lumps.
Step 5: Thickening & Chocolate Fusion Phase
Continue cooking on low heat until mixture thickens.
Then remove from heat and add:
- Melted dark chocolate
- Butter
This transforms the base into:
A deep chocolate custard cream system
Smooth, glossy, and intensely aromatic.
Step 6: First Layer Assembly
Pour half the custard into serving dish.
Allow slight cooling.
Optional: add biscuit crumble layer for structural separation.
This creates:
- Foundation layer stability
- Texture contrast base
Step 7: Final Custard Layer Formation
Add remaining custard carefully on top.
Smooth evenly.
This builds:
- Visual depth
- Structural layering effect
- Dual chocolate intensity zones
Step 8: Whipped Cream Final Layer
Once fully cooled, add whipped cream layer.
This introduces:
- Airy softness
- Temperature contrast
- Visual elegance
Step 9: Chilling & Structural Setting Phase
Refrigerate for 4–6 hours minimum.
During this time:
- Custard stabilizes
- Layers bond naturally
- Chocolate fats set properly
- Texture becomes sliceable
This is where transformation completes.
Step 10: Final Rest Before Serving
Let dessert sit 5–10 minutes outside fridge.
This improves:
- Cream softness
- Chocolate aroma release
- Spoon glide experience
Advanced Chef Tips
- Always use dark chocolate (minimum 60–70%)
- Whisk continuously during heat stages
- Do not rush chilling process
- Use glass dish for visible layering effect
- Add espresso for professional bakery depth
Common Mistakes & Failure Analysis
- Grainy texture → overheated eggs
- Runny custard → undercooked starch activation
- Separated layers → improper cooling sequence
- Weak flavor → insufficient salt or cocoa quality
Storage & Meal Prep System
- Refrigerate: up to 4 days
- Best texture: Day 1–2
- Do NOT freeze (breaks emulsion system)
- Always cover to prevent drying surface
Final Thoughts
The Creamy Chocolate Custard Layer Dessert is more than a recipe—it is a controlled balance of heat, fat, sugar, and structural chemistry.
It represents the fusion of:
- Classic custard tradition
- Modern chocolate engineering
- Layered dessert architecture
When executed correctly, it delivers:
- Silky chocolate richness
- Stable layered structure
- Creamy melt-in-mouth texture
- Balanced sweetness with depth
- Elegant visual presentation
It is a dessert designed not just to be eaten—but to be experienced layer by layer, spoon by spoon.
Leave a Reply