Low Calorie Greek Yogurt Cake – The Ultimate Baking Masterclass
Introduction & Background
In the modern world of food, there is a constant tension between indulgence and health. On one side, traditional baking offers rich, buttery cakes loaded with sugar and refined ingredients that deliver incredible taste and texture. On the other side, growing awareness of nutrition, fitness, and long-term health has led people to seek alternatives that are lighter, cleaner, and more balanced. The challenge has always been the same: how do you reduce calories without sacrificing the very qualities that make cake enjoyable?
This is where the Low Calorie Greek Yogurt Cake stands out—not as a compromise, but as an evolution.
This cake represents a shift in baking philosophy. Instead of removing ingredients and ending up with something dry or flavorless, it focuses on restructuring the recipe intelligently. It leverages the natural properties of ingredients like Greek yogurt to achieve moisture, tenderness, and richness in a completely different way.
Greek yogurt itself has a long culinary history rooted in Mediterranean and Middle Eastern traditions. Unlike regular yogurt, it undergoes a straining process that removes whey, concentrating both its texture and nutritional value. The result is a thick, creamy product that is high in protein, slightly tangy, and incredibly versatile. Traditionally used in savory dishes, dips, and sauces, it has now become a cornerstone of healthy baking.
In baking, Greek yogurt acts as a multi-functional ingredient. It adds moisture without relying heavily on fat, contributes to structure through its protein content, and introduces a subtle tang that enhances sweetness rather than overpowering it. This makes it ideal for creating desserts that feel indulgent while remaining nutritionally balanced.
Low-calorie baking as a concept has gained momentum over the past decade. However, many recipes in this category fall short because they remove too much without replacing functionality. The result is often cakes that are rubbery, dry, overly dense, or lacking depth of flavor.
This recipe is designed to avoid all of those pitfalls. It is built on the principle that every ingredient must have a purpose, and when something is reduced, something else must step in to maintain balance.
The final product is a cake that is:
- Soft and tender with a fine crumb
- Moist without being heavy
- Light in calories but full in flavor
- Balanced between sweetness and subtle tang
It is not just a “diet cake.” It is a cake that stands on its own merit, whether or not you are counting calories.
Chef’s Philosophy & What Makes This Version Exceptional
To truly understand this cake, you need to think like a baker—not just someone following steps, but someone who understands how ingredients interact.
The philosophy behind this recipe revolves around functional substitution, structural balance, and controlled technique.
1. Functional Substitution Instead of Removal
In traditional cakes, butter and oil provide fat, which contributes to softness, richness, and flavor. Sugar adds sweetness but also affects texture, moisture retention, and browning.
When reducing these ingredients, you cannot simply remove them—you must replace their roles.
Greek yogurt steps in as a partial replacement for fat. It provides moisture and a creamy mouthfeel, while its protein content helps maintain structure. However, because it is lower in fat, the mixing technique becomes more important to avoid density.
2. Structure and Crumb Development
A good cake has a delicate crumb—soft but not crumbly, light but not airy like a sponge.
This balance is achieved through:
- Proper ratio of wet to dry ingredients
- Controlled mixing to avoid overdeveloping gluten
- Correct use of leavening agents
Because this recipe uses less fat, it relies more heavily on eggs and yogurt for structure. That means overmixing can quickly lead to a dense texture, so technique matters more than usual.
3. Moisture Retention
One of the biggest challenges in low-calorie baking is dryness. Fat usually prevents moisture loss, so when fat is reduced, other strategies must be used.
Greek yogurt helps retain moisture, but so does proper baking time. Overbaking by even a few minutes can dry out the cake significantly.
4. Flavor Balance
Greek yogurt introduces a mild tang, which actually enhances sweetness rather than competing with it. This allows you to use less sugar while still achieving a satisfying taste.
Vanilla, citrus zest, or spices can further enhance the flavor profile, making the cake feel more complex without adding calories.
5. Simplicity with Precision
This cake is not about complicated steps—it’s about doing simple steps correctly.
Every stage, from mixing to baking to cooling, plays a role in the final result. Precision and patience are what elevate it.
Difficulty, Timing & Yield
- Difficulty Level: Easy to Medium (technique-focused rather than complex)
- Preparation Time: 25–30 minutes
- Baking Time: 35–45 minutes
- Cooling Time: 30–40 minutes
- Total Time: Approximately 1 hour 45 minutes to 2 hours
- Servings: 8–10 slices
Ingredients
For the Cake Batter
- 1 cup thick Greek yogurt (low-fat or non-fat, but not runny)
- 2 large eggs (room temperature)
- 1/2 cup sugar or low-calorie sweetener equivalent
- 2–4 tablespoons oil (adjust based on calorie preference)
- 1 teaspoon vanilla extract
- 1 1/2 cups all-purpose flour or whole wheat flour
- 1 1/2 teaspoons baking powder
- 1/2 teaspoon baking soda
- 1/4 teaspoon salt
Optional Flavor Enhancements
- Lemon zest or orange zest for freshness
- Cinnamon or nutmeg for warmth
- Cocoa powder for chocolate variation
Optional Toppings
- Light dusting of powdered sugar
- Fresh berries
- Yogurt-based glaze
Step-by-Step Instructions
Step 1: Preparing the Baking Setup
Preheat your oven to 180°C (350°F).
Prepare a cake pan by lightly greasing it or lining it with parchment paper. This ensures the cake releases easily after baking.
A properly prepared pan prevents sticking and maintains the structure of the cake.
Step 2: Preparing the Wet Base
In a large mixing bowl, add the Greek yogurt.
Crack in the eggs and whisk thoroughly until the mixture becomes smooth and uniform. This step ensures proper blending and helps create a stable base.
Add sugar or sweetener and mix well until dissolved.
Pour in the oil and vanilla extract. Continue mixing until the mixture looks slightly creamy and cohesive.
Step 3: Mixing the Dry Ingredients
In a separate bowl, combine flour, baking powder, baking soda, and salt.
Whisking these ingredients together ensures even distribution, which is crucial for proper rising.
Step 4: Combining Wet and Dry
Gradually add the dry ingredients to the wet mixture in portions.
Mix gently using a spatula or whisk. Do not overmix.
Stop mixing as soon as no visible flour remains. The batter should be smooth but not overly worked.
Step 5: Adding Flavor Variations
At this stage, fold in any optional ingredients such as zest, spices, or cocoa powder.
Mix lightly to maintain batter consistency.
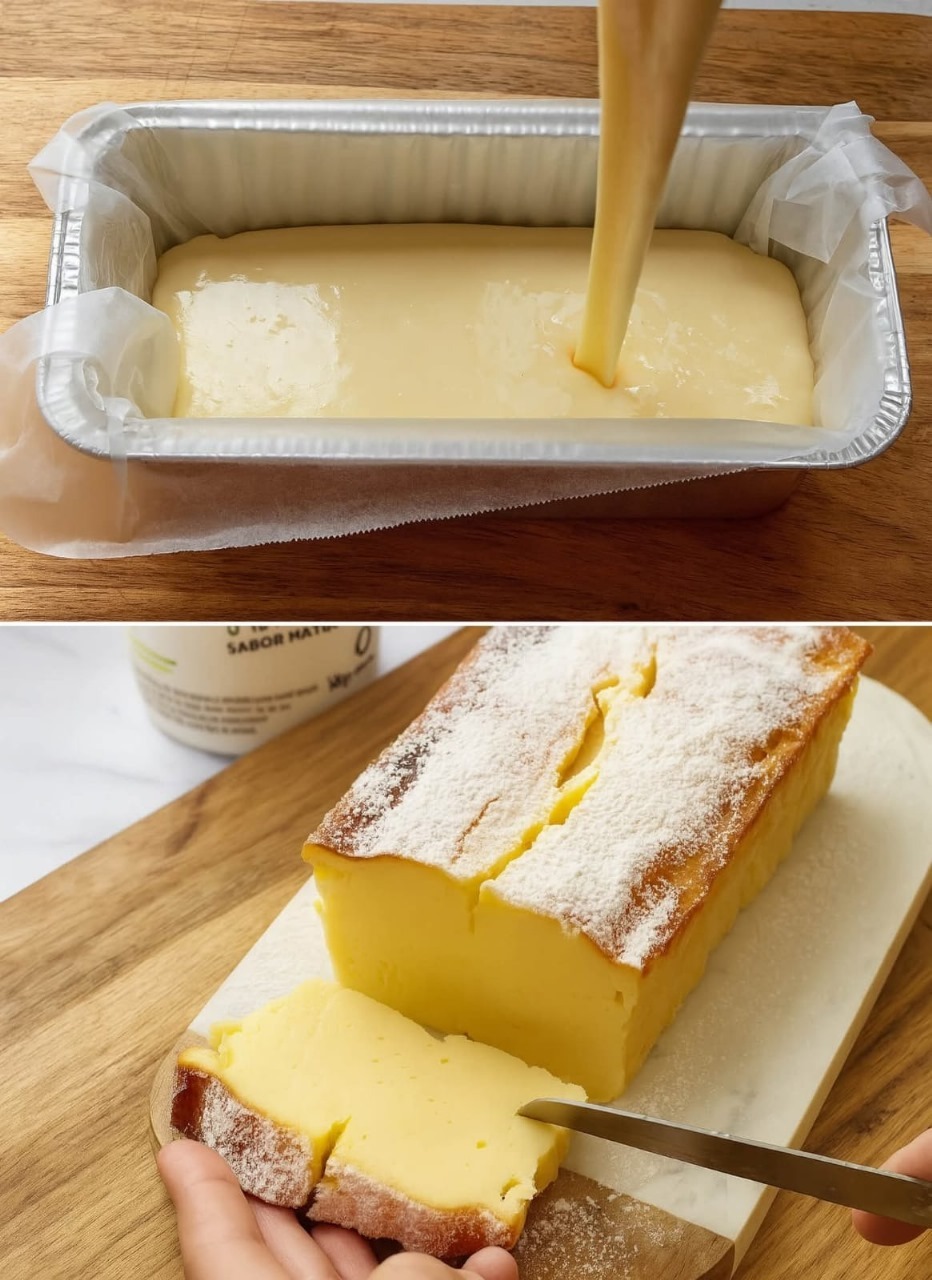
Step 6: Transferring the Batter
Pour the batter into the prepared pan.
Use a spatula to spread it evenly and smooth the top.
Tap the pan lightly on the counter to remove air bubbles.
Step 7: Baking the Cake
Place the pan in the preheated oven.
Bake for 35–45 minutes.
Check doneness by inserting a toothpick into the center—it should come out clean or with a few moist crumbs.
Step 8: Cooling Process
Allow the cake to cool in the pan for about 10–15 minutes.
Then transfer it to a wire rack to cool completely.
Cooling is essential for structure. Cutting too early can cause the cake to crumble.
Step 9: Finishing and Presentation
Once cooled, dust lightly with powdered sugar or add toppings.
Slice into even portions and serve.
Serving Suggestions
This cake pairs well with:
- Tea or coffee
- Fresh fruits
- Light yogurt toppings
It works as both a dessert and a snack.
Nutritional Benefits & Why It Works
- Lower in calories than traditional cakes
- Higher protein content
- Reduced fat
- Balanced macronutrients
Pro Tips for Perfection
- Use thick yogurt only
- Do not overmix
- Monitor baking time carefully
- Adjust sweetness based on preference
Common Mistakes to Avoid
- Using watery yogurt
- Overbaking
- Overmixing batter
- Incorrect ingredient ratios
Creative Variations
- Chocolate yogurt cake
- Lemon yogurt cake
- Berry yogurt cake
- Banana yogurt cake
Understanding the Science Behind the Cake
Greek yogurt adds moisture and protein, replacing some fat.
Eggs provide structure and binding.
Leavening agents create air pockets, giving the cake its rise.
Storage & Shelf Life
Store in an airtight container at room temperature for 2 days or refrigerate for up to 5 days.
Final Thoughts
Low Calorie Greek Yogurt Cake is proof that healthy baking doesn’t mean sacrificing flavor or texture.
It delivers softness, moisture, and satisfaction while being lighter and more balanced than traditional cakes.
It’s not just a substitute—it’s a smarter way to bake.
Leave a Reply